On with it!
Step 1:
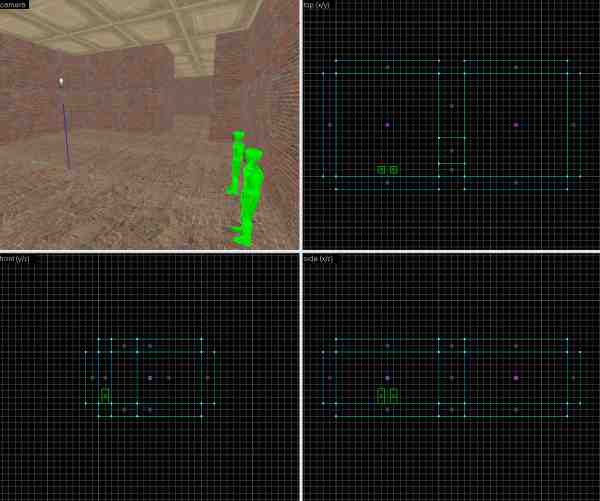
The first thing we do is create the basic geometry of our map. You should be comfortable with this by now, so throw a couple rooms together as I've done here. One will house the object to be instanced, the other will contain the actual "machinery" (entities and such) necessary to create the object. Don't forget to make a player start and some lights, as well (I've used both standard and deathmatch starts here for the sake of completeness, and compatibility with either single or multi player Half-Life).
Step 2:
Next up, we make the template object. We will construct a simple collection of four func_physboxes for the sake of demonstration, but these principles will apply to much larger objects (see Collapsypants) without issue. In the other room, we'll build a simple button that will spawn our ring of blocks when pressed. Each piece of our object gets turned into a func_physbox so it can be tossed around, and our button becomes a func_button.
Step 3:
Now, the most important step, where we create our point entities (entities that sit at a single point in space, are unrendered, and are not based on brushes), name everything, and set up our I/O.
The first thing to do is create the constraints for our object. They will be simple phys_constraints, but like the rest of this tutorial, the basic idea applies to all types of constraints. You'll need four of them, to hold the four pieces of the object together. They can really be wherever you want them, but I prefer to place them somewhere near the joints between their respective objects.
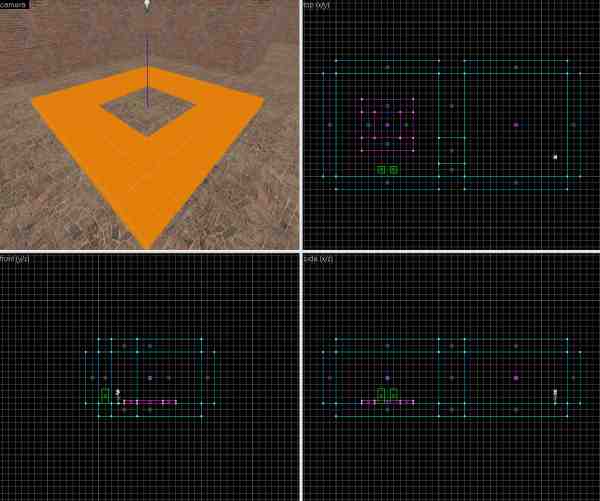
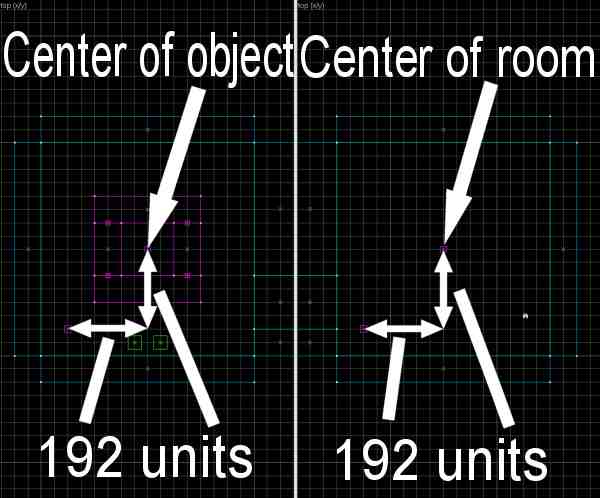
Next up is the point_template. Here, I've placed it one hundred ninety-two units south and west, and sixty-four units above, the center of our object. We then go on to create an env_entitymaker entity in the other room, in the same position relative to where you'd like the center of the object to be when it's spawned. In this case, since we want the object to be created with its center matched up with the center of the room, we need to place the entitymaker one hundred ninety-two units south and west of the room's center, and sixty-four units above it. Since the object to be copied, and the object to be created will always be the same, you don't technically have to think of it as relative to the object's center; you could simply say to yourself, "The point_template is in this position relative to the corner of the object, so I'll place the env_entitymaker in the same position relative to where I'd like that same corner to appear when the object's spawned". However, this is not--in my understanding--how the engine thinks of things, and it can be a whole lot easier to think in terms of the object's center, so start getting in the habit.
The bottom line is, you pick out where you want the object to be centered when it appears, then offset the env_entitymaker the same distance from that point as the point_template is from the center of the template object. The screenshot should make this a touch clearer.
Okay, now that I've caught my breath, let's name our entities. You can name them anything you like, but it's much easier to deal with these kinds of things if the names are descriptive. If you really wanted to call the four blocks in this example Dave, Steve, Arnie, and Ephram, you could, but it might not be wise.
The important thing to remember is to add a prefix of some sort to all similar pieces. In this case, since the object is something that will be destructible, I've added the word "destruct" to the beginning of each block. Likewise, each constraint gets "constraint" at the beginning of its name. It does not NEED to be that particular word, it can be whatever you want, I only chose it because it made the most sense to me. The importance of these prefixes will be explained in the Q&A section below, so have patience, it'll make sense in the end.
Next up is the point_template, which I've decided to name "template_boxring", due largely to the fact that it's a template that references a small ring of boxes. Not exactly rocket science, nor is naming the entitymaker "entitymaker_boxring". The func_button does not need a name for our purposes, so you can ignore that.
Now, I/O Silver, away! ... Oh, shut the hell up, that's funny. We will first of all get our constraints attached to their respective objects: each one connects two pieces of our structure together, so we open up the constraint properties, and assign one object to Entity 1 and the other to Entity 2. They're constrained, congratulations. We perform the same procedure for all four constraints.
Following that, we open up our point_template's properties page, and click the "Template 1" entry. In the value entry field, we type "destruct*" (without quotes), and in the entry field for "Template 2" we enter "constraint*". The asterisks function almost like wildcards in a standard command prompt, and allow you to have the point_template entity refer to EVERYTHING in the map that begins with the word "structure" at the same time, all with a single entry. You'll note also that the entry remains red, even after clicking "Apply". Usually this means that nothing in your map has that exact name, and indicates a typo somewhere. Wildcards, on the other hand, will always be red, whether they exist in the map or not. You should check your spelling anyway, just in case, but don't get freaked out by the red.
Moving on, we open the properties of our env_entitymaker, and enter "template_boxring" in the "Point_template To Spawn" field. Once that's set, the only thing left to configure is our button. Upon opening our properties page, we go immediately to the spawnflags tab and check the "Don't Move" box--it'll just look stupid to have a moving button in this example. If you want one, though, go right ahead, no one's stopping you. Really just an aesthetic choice on my part, and not terribly important. No, what we really need to worry about is the "Outputs" tab. Once there, we add an input, and examine the various options. Since we want this button to do something when it's used, we pick "OnIn" from the "My output named" list. Once the button is activated, we want it to fire our env_entitymaker, to make our entity, so we select "entmaker_boxring" from the "Target entities named" list. Next, because we want to force the entitymaker to spawn our object when fired, we select "ForceSpawn" from the "Via this input" list. The input you choose dictates what the entity does when fired. For example, if you fired it through the "Kill" input, you'd remove the entity from the map, something we'll do with our next set of Outputs. Finally, enter a delay of half a second in the field toward the bottom of the Outputs tab, to keep this output from conflicting with our next two. Speaking of which...
We can either click "New" to make a new output, or "Copy" and then "Paste" to work from the values of the selected input. Doesn't really matter, though you'll find Copy and Paste very useful on large structures. The details of this input are as follows: we want an Output of "OnIn", like the last one, a Target Entity of "destruct*", a Target Input of "Kill", and a delay of zero. We then copy this output, and change "destruct*" to "constraint*", leaving the other settings alone.
What do we accomplish with this? Once the button is pressed, all existing entities whose names start with "destruct" and "constraint" will immediately be removed (killed), and after half a second, a new one will be created. The reason we get rid of the old stuff is twofold; we improve performance by getting rid of unnecessary entities, and we eliminate constraint conflicts. I would imagine, though I cannot be sure, that it's not strictly necessary to delete the constraints. You might be able to get away with it, but given my limited understanding of game engines, I believe there's a strong chance of a pseudo-memory leak if they're not taken care of. You get rid of the entities that are being constrained, and end up with bunches of constraints sitting around consuming memory yet doing nothing. Could cause a crash, for all I know, so I prefer to play it safe.
And that's the name of that tune! Compile, run, find button, hit button, enjoy! Everything should work now, though I'm sure you have a few questions, which I've anticipated, hence the following question/answer session. Please take note of it, this stuff is mildly important.
Q&A
Q: My thingie is gone!A: Yes, it is. Why? Because your point_template has the "Don't remove template entities" flag UNchecked, as is the default. If you want the original template object to stay put, check this box and recompile.
Q: Why should I use wildcards? Couldn't I just have the point_template reference each entity directly?
Yes, you could. Instead of using the wildcards, you could simply type the name of each individual entity into the entry fields "Template 1" through "Template 16". But a point_template can only reference sixteen objects...what do you do if you have more? Before you say it, no, you cannot simply use more than one point_template. It will function, sort of, and spawn everything you told it to, but inter-template constraints won't do what you want them to. Put simply, if the objects they're supposed to constrain are themselves referred to in separate point_templates, they won't work. The objects will simply spawn, and then fall where they may, according to the game's physics model. If you want the constraints to work, they must be called at the same time as ALL of their component pieces. Wildcards let you do this, referencing as many different items you want with only a single name.
Q: Why can't I name EVERYTHING I want to spawn with the same prefix? Do I have to separate the physboxes from the constraints?
A: No, you don't have to separate them. The only reason I made a distinction, using "destruct_" for each func_physbox and "constraint_" for each constraint was for organizational purposes. It's more helpful than you might initially think to have things neat and tidy like that, helps keep you from going nuts trying to figure out what the hell you're looking at. But using the same prefix, or even the same entire name, would work from a mapping perspective.
Q: You said earlier that Half-Life 2 wildcards function "almost" like regular ones...what does that mean?
A: It means that in Half-Life 2, everything after the asterisk is forgotten about. Whereas in your operating system you could do a search for "foo*bar" and receive a list of files whose names start with "foo", end with "bar", and have anything in between, in Half-Life 2, you're referring to everything that starts with "foo". That's it. The end, "bar", is not even considered, as it's after the asterisk.
At least, that's the way I've seen it explained. Valve may change this behavior in time, if they haven't already. Correct me if I'm wrong, I don't mind.
Q: Do I absolutely need to create an entire separate room dedicated to my template objects? It seems like a real pain, and potential performance killer.
A: Nope, you don't need to do that. I only did it in the tutorial to keep things easy to understand. Once you're familiar with the whole concept, you can keep everything in one place, as I did in Collapsypants. I'd recommend constructing things separately for testing purposes, but once that's done you can move the original structure into place. Once you've done this, and you have the "Don't remove template entities" checked, you can compile your map and end up with the original structure right where you want it, with no need for a separate template area. Be careful not to get confused, though, as due to the "relative offset" calculations (I made that name up, programmers please don't get angry if it sounds stupid) the point_template and env_entitymaker will need to be in the same spot. Don't let the way it looks fool you, though there may only appear to be one, there are indeed two entities occupying the same space.
That's about all I can think of at the moment, but feel free to email me if you have any others. They may just end up on this page, if they help clarify things.